As a micron (μm) level precision measuring instrument, Laser Tracker measurement accuracy has been recognized by many advanced manufacturing industries and research institutes, with their presence reaching around the world. A single laser tracker is able to achieve ultra-high precision measurement.
There are some precision engineering projects, however, with more stringent requirements for measurement accuracy. Sometimes, this is because of moving parts on a robot or a dynamic measuring environment or a need to reduce measurement angle error in real-time. For applications such as these, API has developed a measurement solution that utilizes multiple Radian Laser Trackers capturing data simultaneously to create one dynamic data map for the measuring environment. This solution realizes 6DoF dynamic and high-precision measurements and greatly improves target measurement accuracy.
The following sections detail the components of this Multi-Tracker Solution and show three applications where it can further improve measurement accuracy.
System Composition
1. API Radian Pro Laser Trackers
API’s Radian Pro Laser Tracker is equipped with ADM (absolute distance) and IFM (interferometer) lasers; IFM laser is the standard of length measurement, which provides a high precision guarantee and data traceability for the whole system.
2. TTL (or other) Data Synchronization System
A Data Synchronization System is a device which can trigger multiple Laser Trackers to collect data at the same time. There is a special signal generator in this system, and this generator uses a pulse signal to order the multiple trackers to collect data at the same time. The user can set the order to in which trackers are triggered during the measurement task.
3. API Signal Synchronous Processing Software
This software is proprietary to API and is used to analyze data collected from multiple trackers. The software can fulfill various needs, including unifying the coordinates of multiple trackers, defining the coordinates of the target, and synchronously analyzing the collected data.
Sample Applications

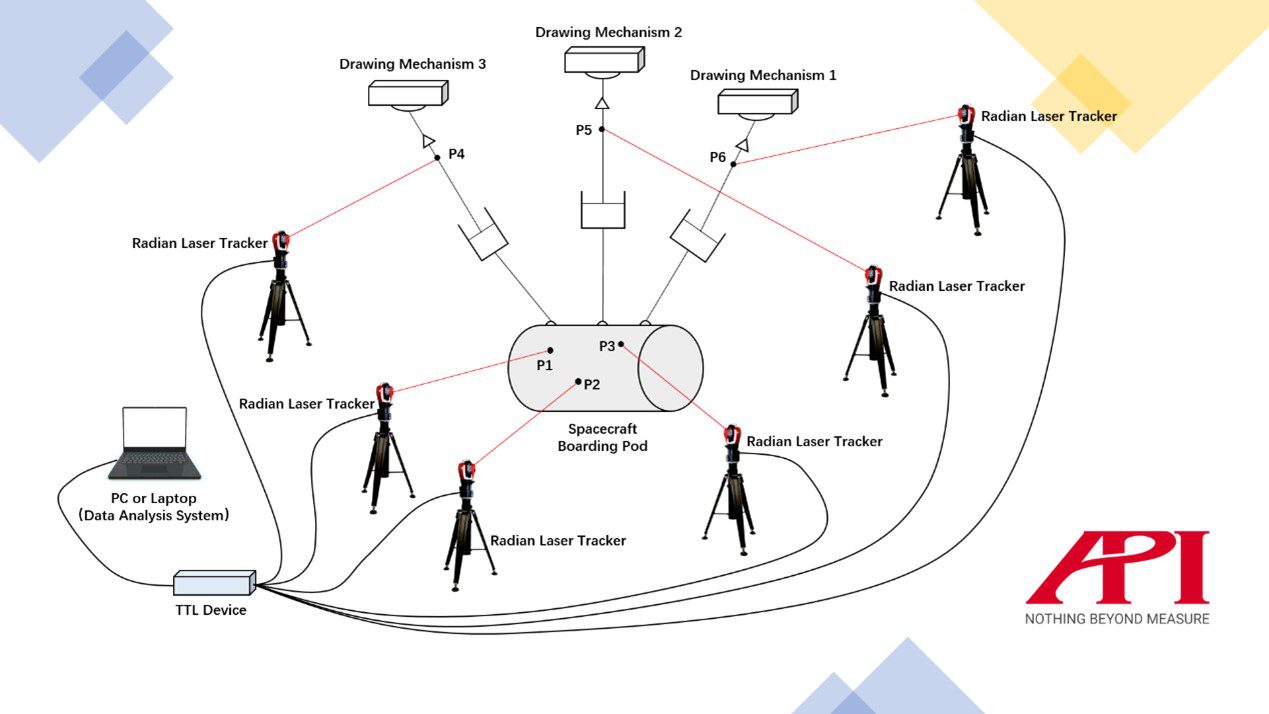
Picture 1: Schematic Diagram of the Spacecraft Landing Module 6 Degree of Freedom Measurement with API Multi-Trackers Measurement Solution
1. 6 DoF measuring, monitoring, control, and real-time adjustment of spacecraft landing module
Purpose of Measurement
The landing module of the spacecraft is affected by gravity, airflow, and many other factors in the landing process, all of which cause shaking. In this application, the stretching mechanism is used to simulate these forces, causing the landing module to shake, while several Laser Trackers are used to synchronously monitor the mathematical relationship between the reference points, so as to obtain scientific data. Using the data, the force and direction of the booster rocket jet at the bottom of the landing module can be adjusted, so that the landing module can land stably.
Process of Measurement
Three points, P1, P2 and P3, are set on the landing module, and three Radian Pro Laser Trackers are used to carry out real-time dynamic tracking measurement and monitoring of its 6 DoF data. Another three Radian Pro Laser Trackers are used for real-time tracking and monitoring of points P4, P5, and P6, located on the stretching mechanism. The 6 Laser Trackers are triggered to measure at the same time by the synchronizer, and then the recorded data is sent to the PC or Laptop. Synchronous processing software is used to analyze the data, and the mathematical relationship between the reference points, and then the thrust force and direction of the rocket are adjusted according to the data.

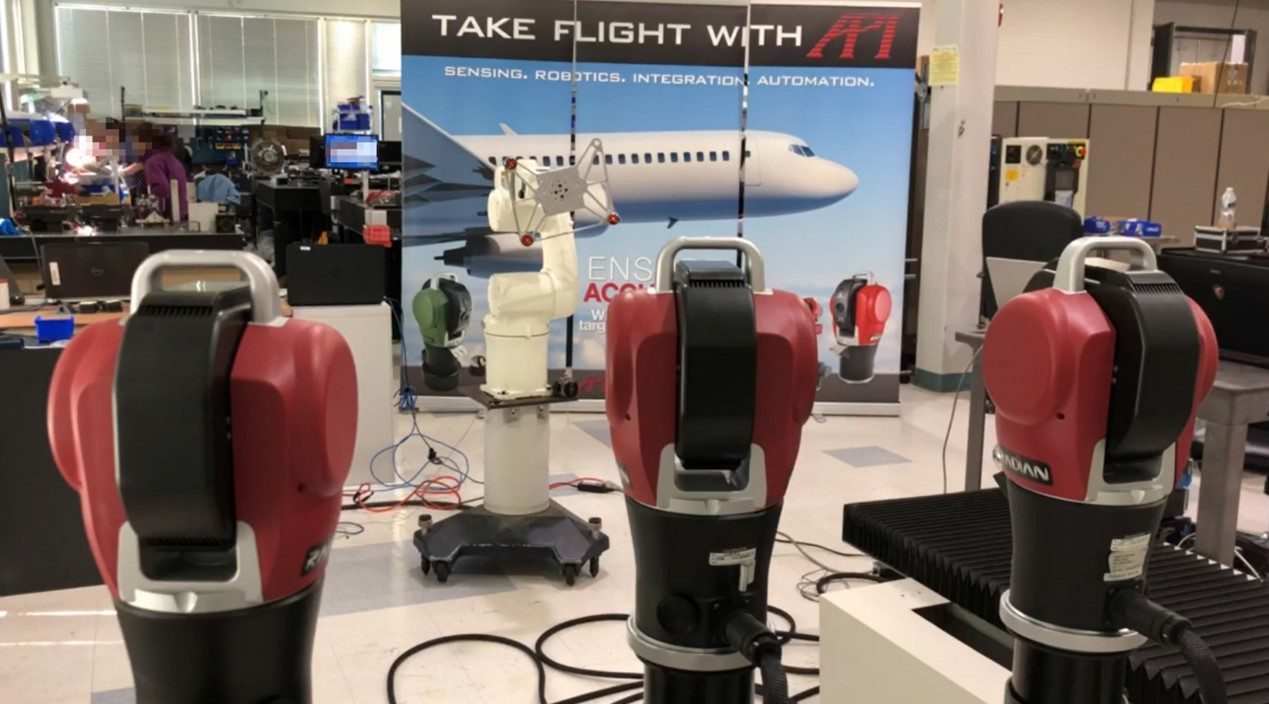
Picture 2: Industrial Robot Dynamic 6 DoF Measurement by Multi-Trackers
2. Industrial Robot 6 DoF Dynamic Measurement
Purpose of Measurement
To measure 6 DoF dynamic precision of industrial robots, so as to better evaluate the spatial accuracy of each position of the robot in its moving path, and, according to the data, the corresponding data compensation and working path optimization of the robot are carried out.
Process of Measurement
The Spherically Mounted Retroreflector (SMR) bracket is arranged at the end of the industrial robot, and three SMRs are arranged on the bracket. Three Laser Trackers track one SMR respectively, and each SMR’s positional data throughout the movement process is collected and measured dynamically in real-time. The collected data is fed back to PC or laptop for calculation, and serves as data support for robot calibration and compensation.

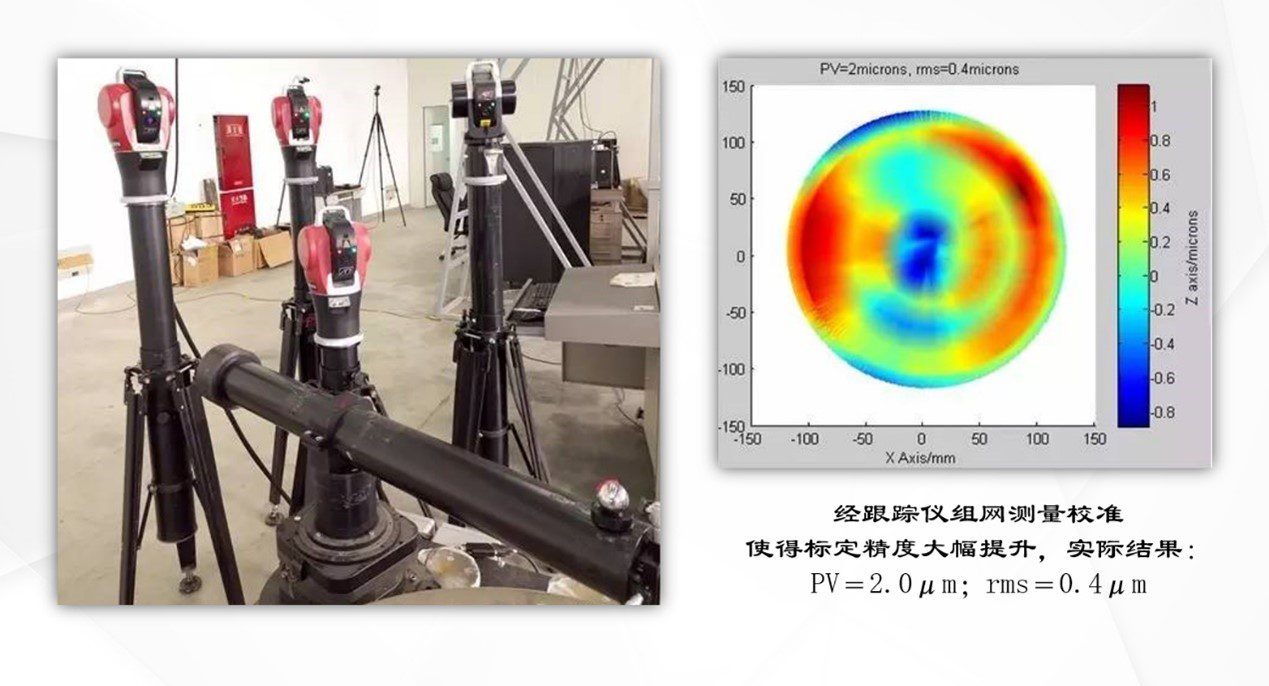
Picture 3: Four Laser Trackers are Used to Measure Large Aspheric Mirrors with High Precision
3. Extreme High Precision Measurement of the Measured Target
Purpose of Measurement
Significantly improve the measurement accuracy of the measured objects. With rapid development, large-scale aspheric optical systems have been used more and more widely in the fields of astronomical observation and space optics, and have become the mainstream of optical system development. However, the in-position detection of large aspheric surfaces (especially convex aspheric surfaces) is very difficult, which is one of the technical bottlenecks restricting the development of such optical systems. To solve this problem, a popular research topic is how to apply swing arm contour detection technology for high-precision in-position detection.
Process of Measurement
90% of the measurement error of a single Laser Tracker is from angular error. In API’s multiple tracker solution, several trackers measure one point at the same time, and calculate its position according to the multiple data points collected based on the tracker’s own position as well as to the location of the point, so as to maximumly avoid the tracker’s angular error.
Conclusion
The above applications cases highlight the capability and operability of the multi-tracker measurement solution in realizing 6 DoF, dynamic, high-precision measuring and monitoring of a target and greatly improving the measurement accuracy of the target position.


